

13 Technical issues
Some technical below-the-surface info.
13.1 The intranet tool
The intranet tool was developed for recent versions of Firefox, Google Chrome, Safari, and Edge. It will work with all browsers in the same way, with only minor differences. Internet Explorer is not supported.
The interface will use the preferred language setting of your web browser. Currently, only Dutch and English (the default) are available. Configure the language preferences in your web browser to choose the interface language.
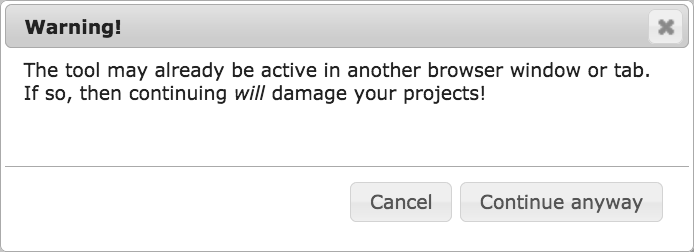
It is not possible to use Raster in multiple tabs or windows of the same browser. When Raster is active in more than one browser window or tab, your project data will get damaged and you will likely lose all your work. The tool will warn you when it may already be running in another tab.
In rare cases you may see this warning even though no other instance of the Raster tool is active. This may happen, for example, when the browser crashed and could not exit cleanly. When this happens, make absolutely clear that Raster is not running elsewhere before continuing.
It is, however, possible to use Raster with two separate browsers on the same computer. For example, once in Firefox and once in Chrome. If the project is not private but shared (see Working with the intranet application), then it is possible to work on the same project simultaneously. Shared projects can also be viewed and edited from two computers simultaneously.
13.2 Computation of vulnerability levels
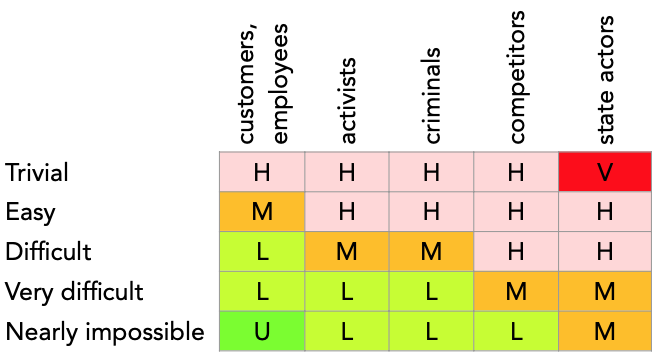
For malicious vulnerabilities the frequency depends on both the worst plausible attacker and the level of difficulty, as in the table below.
The following table describes the way that the Raster tool computes a vulnerability level from a frequency and impact class.
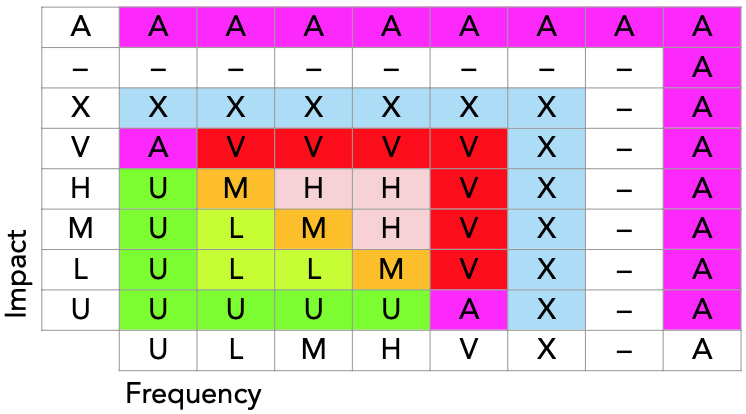
As can be seen from the table, the inner part for frequency and impact L, M, and H match expected damage, even though frequency and impact are not fully numerical. These three classes represent modest values, for which 'frequency times impact' assessment is suitable.
When impact is extremely high (V), it does not matter what the frequency is, as the risk is unacceptable at any probability. When frequency is extremely high (i.e. near certainty), we are almost certain that damage will arise, and are therefore obliged to prepare countermeasures. In this case the risk will also be unacceptable.
When the impact is extremely low (i.e. nearly absent, symbol U), we do not really care whether the incident happens; the risk will always be extremely low to us. The same consideration applies for situations where the frequency is extremely low.
These considerations are ambiguous when one of frequency or impact is V, and the other U. However, we do have a class for ambiguity, namely A.
When either the frequency or the impact is not known, the combination also cannot be known. In these combinations, we always want to preserve ambiguity, as we believe that information to be highly relevant to decision makers. When an undetermined value (the minus symbol in the table) is involved, the result must also be undetermined as that value could turn out to be ranked as ambiguous rather than simply unknown; until we assess the value of that factor, the result of the combination is still undetermined. When neither the value A nor – is appropriate, the combination is ranked as a `plain' unknown (symbol X).
The overall vulnerability score for a node is computed by taking the 'maximum' vulnerability score of all vulnerabilities on that node. The vulnerability levels, in order from lowest to highest, are:
(lowest) - U L M H X A V (highest)Note that here also the symbol – indicates the 'not yet analysed' level.
13.3 Creating iconsets
An iconset is a collection of cartoon-style images to create Raster diagrams. You can create your iconsets. Use the Default iconset as an example.
Each iconset should be stored in its own directory inside the
iconset directory. The name of the directory should match
the name of the iconset. The iconset must contain a description in JSON
format; the file must be called iconset.json; e.g. for
iconset Medical the description must be stored in
iconset/Medical/iconset.json. See below for the definition
of the the iconset.json file.
Icons have a type (either wired link, wireless link, equipment,
unknown link or actor). There must be one or more icons for each type.
For each icon there must be two files: the icon and its icon mask. If no
mask is specified, the mask is assumed to have the same name as its icon
but with -mask appended (and with the same extension). In
addition to the icon and the mask, the first icon of each type must
specify the template-image (the user drags the template from the toolbar
onto the workspace to create new nodes). If no template image is
specified, then the name is assumed to be the icon name with
-template appended.
E.g;
- icon
machine.pngwill have the default maskmachine-mask.png, and the default template will bemachine-template.png. - icon
tube.jpegwill have the default masktube-mask.jpeg, and the default template will betube-template.jpeg.
Files for icons, masks and templates may be stored in the iconset
directory (at the same level as iconset.json) or in
subdirectories.
13.3.1 Creating icons and masks
Icon and mask images typically have transparent areas. The icon is displayed on a colored background. Some areas of the icon will have the background color. The mask image determined the extent and size of the background. Non-transparent areas of the mask will take the background color, transparent areas of the mask will remain transparent. The icon is drawn on top of its background.
- Outlines and areas that must always be visible in the foreground color: include these in the icon.
- Areas that should be visible in the background color: make these transparent in the icon, and non-transparent in the mask.
- Areas that should always be transparent: make these transparent in the icon and in its mask.
13.3.2 iconset.json
This must be a valid JSON file, containing a single object. Some of
the (sub-)fields are multi-language strings. Multi-language strings are
objects in with property names are (capitalized) language codes, and
property values are the string in that language. E.g.
{"EN": "This is an example", "NL": "Dit is een voorbeeld"}
Fields are mandatory, unless specified as optional.
Fields
setDescription: Multilanguage string (optional), a phrase describing this iconset.icons: Array of icon descriptions; see below.
The first five icons in the array must be of types tEQT, tWRD, tWLS, tUNK, tACT, in that order. Any additional icons must be specified after these five.
Icon descriptions
type: String, one of tWLS, tWRD, tEQT, tUNK, tACT.image: String, the name of the image file.mask: String (optional), the name of the mask file. Default = derived from the image filename.template: String (optional), the name of an image file that can be used as the template image. Default = derived from the image filename.name: Multi-language string (optional), description of this icon. Default = image filename.width: integer (optional), the default width of the icon in pixels. Default = 100. Allowed range is 20..200height: integer (optional), the default height of the icon in pixels. Default = 30. Allowed range is 10..100title: String (optional), location of the title, one ofinside,below,topleft. Inside: the title is centered horizontally and vertically within the icon. Below: the title is drawn centered and below the icon. Topleft: the title is aligned to the left margin, and vertically aligned at the top. Default =inside.margin: String (optional), left and right margin of the title as a percentage of the icon width. Does not apply when title = below. Increase the margin to fit the title inside the icon. Default = 0.offsetConnector: real number between 0.00 and 1.00 (optional). The connector is always drawn at the top of the icon; this offset specifies its horizontal location: 0.00 means at the extreme left, 0.5 means centered, 1,0 means at the extreme right. Default = 0.5.maintainAspect: boolean (optional). If false, the width and height can be adjusted independently. Default = true.
Make sure that iconset.json is a valid JSON file. Raster
will report parsing errors in the Developer tools|Console.
13.4 Project Groups
This section applies to the intranet tool, not to the standalone tool.
A group is a separate area in which projects can be stored
on the web server. The group’s directory can be protected using the web
server’s access authorization; a sample htaccess file is
provided as an example. Although groups are mainly useful for Shared
projects, all Private projects belong to a specific group as well.
The default group is called public_group and has no
access control; the web server administrator can override this if
required.
To create a new project group (called samplegroup in
these instructions):
- Duplicate the public_group directory structure as a new directory
samplegroup. All files should be readable by the web server; the directorySharedProjectsshould be writable. - Set access permissions, if required.
- Add one or more iconsets, if required.
- Create a suitable project to be used as the template (starting point for new projects), if required.
- Inspect and modify the settings file
group.jsonif required.
13.4.1 group.json
The settings for a group are stored in a JSON configuration file. Currently the file may contain these fields:
- classroom: (boolean, default is
false) If true, classroom functionality is enabled on this group. See below. - template: (string, default is “Project Template”) The name of the project that will be used as the starting point when a new project is created, instead of a blank project. Set to “” to disable the template.
- iconsets: (array of strings, default is [“Default”]) The
names of the available iconsets; the first set will be used for new
projects. If a
templateis specified, the iconset in the template project takes precedence for new projects. See theIconsets.mdfor details. - localonly: (boolean, default is
false) If true, projects cannot be retrieved nor stored on the server. The template will still be used, if present. If this set, only private projects will be possible.
A template is most useful to define default iconset, vulnerabilities and labels, instead of the builtin defaults. It is possible, although perhaps less useful, to include services and nodes in the template.
If no shared project with the template name exists, an empty project (with builtin defaults) will be used instead.
The
classroom option
For training purposes it may be useful to provide sample projects to
the students, which the students should not be able to modify. This can
be achieved by setting the classroom property to
true. When classroom functionality is enabled, opening a
shared project will create a new private copy instead. This way each
student can open the projects provided by the course teacher, and make
their own personal changes.
Students cannot set their private projects to shared, to prevent them
from uploading their work for others to see. You can think of the
classroom option as “can retrieve but cannot store”.
Note: when classroom functionality is enabled, shared projects will be called “Exercises” in the project library on the Projects toolbar.
The
localonly option
When localonly is set to true, the server
offers even less functionality. No project can be stored on the server,
as is the case when classroom is true. But in
addition, no projects will be retrieved from the server. The list of
projects in the Projects toolbar will only show private projects.
However, the template project will still be retrieved from the server if
localonly is set.
You can think of the localonly option as “cannot
retrieve and cannot store”.
Preparing the web server
To put the course materials (with the classroom option)
and/or template on the web server, first temporarily disable the
classroom and localonly properties by setting
them to false in the group.json file. Then
create your projects, and share them (in the project properties using
the tool) to upload them to the server. Edit as required. Finally, when
all is set, edit group.json again to set
classroom or localonly options to true.
When either the classroom or localonly
option is true, the SharedProjects directory on the web server can be
made read-only.
Iconsets for project groups
Additional iconsets can be installed in two locations: either in the
img/iconset directory or in the group’s directory. Iconsets
installed in img/iconset are available to all groups on the
server. Iconsets installed in a group’s directory are available to
projects in that group only. In either case it is not sufficient to
install the iconset files on the web server: it must also be explicitly
enabled using the iconset field in
group.json.
Installing a new iconset therefore requires two steps: copying the
new set into the iconset directory (either under
img or in de group’s directory), then edit the
group.json file accordingly.
13.5 Standalone configuration
This section applies to the standalone tool, not to the intranet tool.
There are a few advanced settings that can be modified by editing the
prefs.json configuration file. This file is stored in the
user’s application data directory:
- On Windows:
%APPDIR%(most oftenC:\Users\«username»\AppData\Roaming\Raster). - On MacOS:
Library/Application Support/Rasterin the user’s home directory.
13.5.1 prefs.json
The file prefs.json is used by the Raster application to
save user preferences between sessions. This is a plain JSON file, and
the two relevant properties are:
disablehardwareacceleration: Set this tofalseto enable hardware acceleration. It is disabled by default for maximum compatibility.iconsets: This is an array of strings that specifies the names of the available iconsets. The the first name will be used for new projects. To disable the “default” iconset and only allow iconset “myicons”, use the following line:"iconsets": ["myicons"]
13.5.2 iconsets
Each project will use one iconset for its diagrams. Two iconsets are
provided: “Default” and “Classic”. You can create and add addition
iconsets; see the file Iconsets.md for details. Additional
iconset must be stored in the user’s application data directory, inside
the iconset directory. The iconset directory
does not exist by default; create it before adding custom iconsets.