11 Common cause failures view
Cluster components and assess common cause failures.
In the common cause failures view, you assess the possibility of two or mode nodes failing simultaneously. Most often, two nodes must be sufficiently close together before a single event can make both fail. For example, two equipment items in the same building will fail in a single area-wide power failure.
The common cause failure view does not have tabs for each service. Common cause failures are assessed for the project as a whole. This assessment is done once for each vulnerability, as long as that vulnerability occurs at least twice in the project. Vulnerabilities that occur only for a single node are not shown; for a common cause failure event to happen, at least two nodes must be involved.
11.1 Vulnerability assessments
Each vulnerability is presented using a header, followed by assessments for each cluster and finally by the nested list of clusters and nodes.
Each common cause vulnerability is shown using a collapsible header. The marker Incomplete appears when any one cluster has not been assessed. An assessment is complete when both the frequency and impact are set to a value other than “–”. Open or close the common cause assessment by clicking the header. You can collapse or expand all assessments at once, using the Collapse all and Expand all buttons on the Home toolbar.
When a header is opened (expanded), a table of vulnerability assessments of clusters is show below it. Lines indicate the structure of clusters-within-clusters. In this area you can rename a cluster, by clicking its title (press Enter/click elsewhere to confirm, press Escape to cancel). Note that the root cluster always has the same name as the vulnerability itself, and cannot be renamed. You can change the frequency and impact. Click to activate the selection widget. Click the widget to open it, or type the letter of your choice. You can also add or edit remarks.
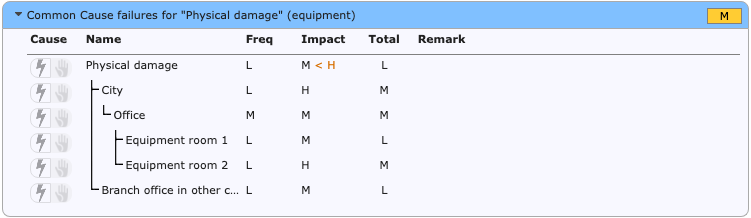
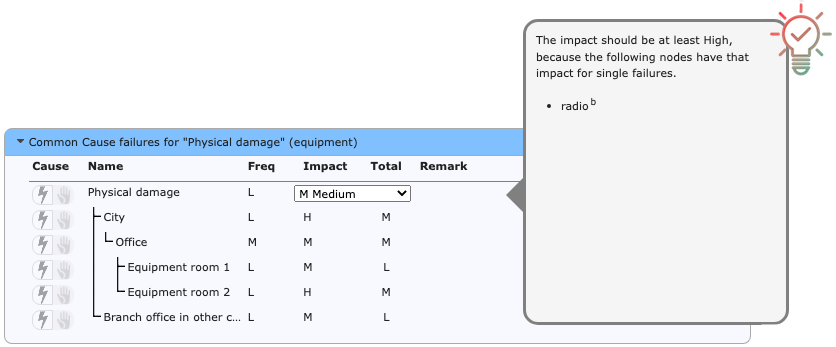
The frequency assessment of clusters is often lower than the frequencies for the individual components in the cluster. That is because the failure scenario is more involved and larger. But if the vulnerability leads to an incident, the impact for the common cause failure should be at least the highest impact for the components of the clusters.
Suppose that failure of a router will lead to long-term unavailability of a telecom service. The impact class for that is High. Simultaneous failure of that router and another component will also lead to long-term unavailability, and should therefore also be assessed at least as High.
The Raster tool will show a warning when the impact has such a lower limit. When an impact below this limit is assigned, a warning will be shown (see below).
To show the contents of all clusters for a vulnerability click its header. The currently selected header is drawn in blue. The contents are then shown on the right.
11.2 Nodes and node clusters
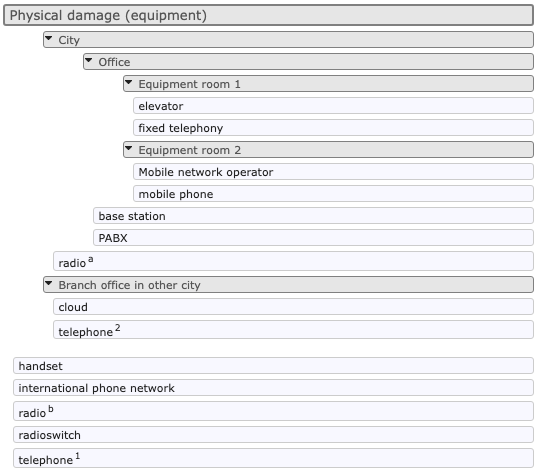
All nodes subject to the vulnerability are listed to the right the table of vulnerability assessments. Initially all the nodes as shown in a single list, sorted by label and by name. There are two mechanisms to sort nodes into clusters: by using the menus or by 'drag and drop'. Either way you can group nodes into clusters, and rearrange nodes and clusters in a nested structure.
11.2.1 Nodes
Each node is shown using a simple white row. You can select one or more nodes, and use the popup menu to move the selection into a new or existing cluster.
You can:
- select a single node, by clicking it. The node is highlighted in blue to indicate that it is now selected.
- select or unselect individual nodes, by clicking the node while holding the Control key (on Windows) or the Command key (on Mac OS X).
- select a series or nodes, by clicking an unselected node while holding the Shift key. All nodes between the last selected node and the current node become selected.
- unselect all nodes, by clicking somewhere on the workspace.
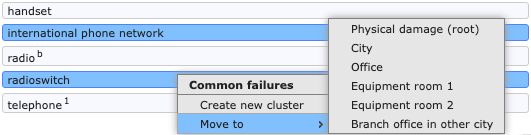
To move all currently selected nodes, use the right mouse button to call up the popup menu.
- Create new cluster. Use this menu item to move the selected nodes into a new cluster. The new cluster will become a subcluster in the cluster in which the last nodes was selected.
- Move to: Move the selected nodes into an existing cluster.
Note that after moving nodes, any clusters with less than two nodes or subclusters remaining will automatically be cleaned up.
11.2.2 Cluster headers
Each cluster has a grey header; the nodes in that cluster are listed below the header, after the subclusters (if any). Unlike nodes, cluster headers cannot be selected.
Open or close the cluster, by clicking the header (either on the triangle or to the right of the title). Rename the cluster by clicking its title. Note that the root cluster cannot be closed nor renamed; it always has the same name as the vulnerability itself.
To move or remove a cluster, use the right mouse button to call up the popup menu.
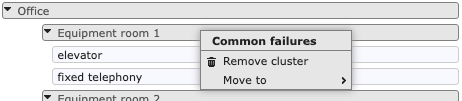
- Remove cluster. Use this menu item to dissolve the cluster. All nodes in the cluster will be moved into the parent cluster.
- Move to: Make the cluster a subcluster of an existing cluster. Note that after moving clusters, any clusters with less than two nodes or subclusters remaining will automatically be cleaned up.
11.2.3 Drag and drop
Nodes and clusters can also be arranged and rearranged using 'drag and drop'. Clusters are dragged by dragging their header row. While dragging a node or cluster, all possible drop targets light up in pale green. You can first select a number of nodes, then drag them collectively. You can:
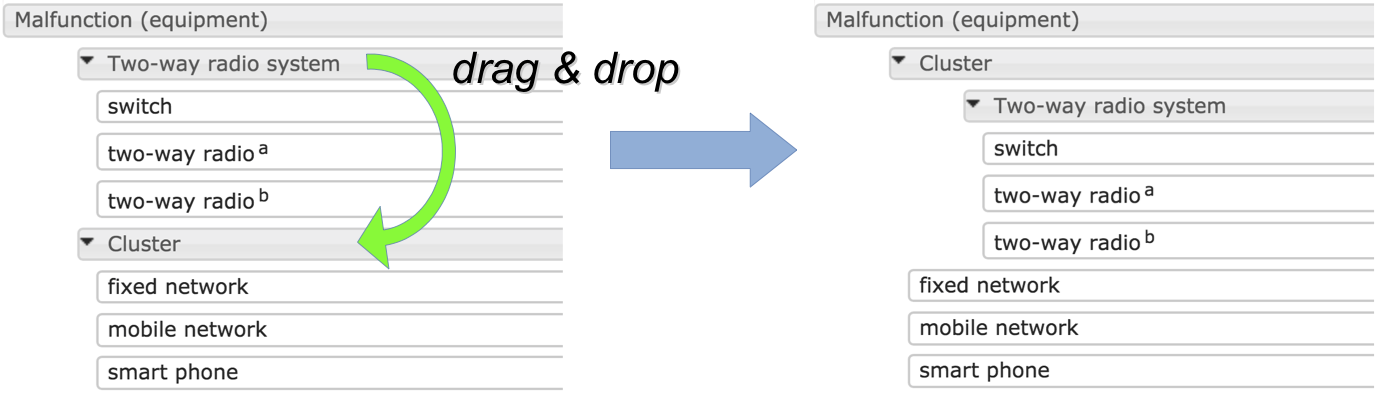
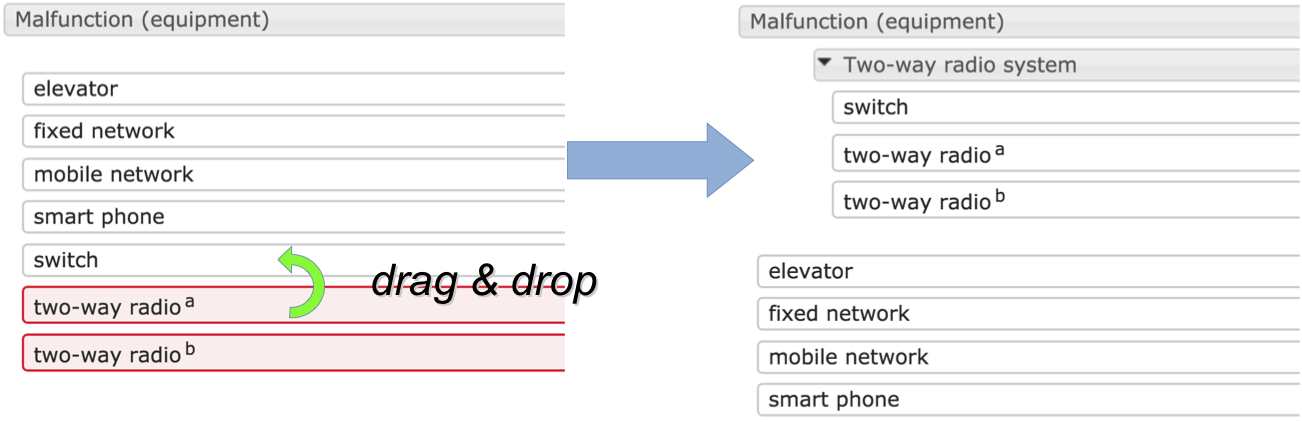
create a new subcluster, by dragging a node onto another node. Both nodes must belong to the same cluster, and will be combined into a new subcluster thereof. See the picture below. The new cluster will get a default name, and the two nodes and all other selected nodes will be shown beneath it, indented from the left margin.
move a node or selection, by dragging it onto the header of any cluster.
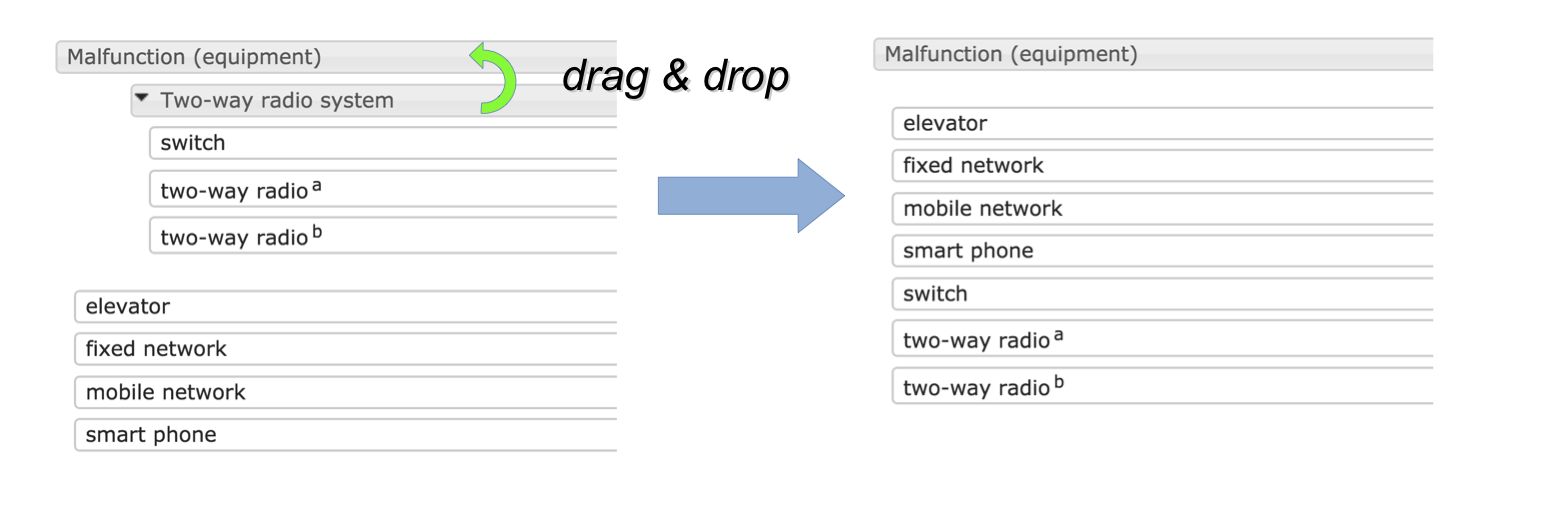
remove up a cluster (dissolve it), by dragging the cluster header onto the header of its parent, as illustrated below. The nodes in the cluster will be merged with the parent cluster. When a group is removed, the assessment for that group will be lost.
move a cluster, by dragging its header onto the header of any cluster except its direct parent. The cluster will become a subcluster of the cluster on which it was dropped, as illustrated: